> ## Documentation Index
> Fetch the complete documentation index at: https://docs.asa.so/llms.txt
> Use this file to discover all available pages before exploring further.
# Shopify
> Connect Shopify so Asa can learn from your products, pages, blogs, and policies — the foundation for accurate storefront answers.
Your Shopify catalog is Asa's most important content source. Connect your store, then choose exactly what Asa should learn from.
**Today, use the Custom app path.** The official Asa Shopify app is in App Store review and is not generally available yet. Once it is approved, you will be able to install from the Shopify App Store instead of creating a custom app.
Use this path now — connect Asa with a **Shopify custom app** and Admin API credentials from the [Shopify Dev Dashboard](https://shopify.dev/docs/apps/build/dev-dashboard).
In your **Shopify admin**, go to **Settings > Apps and sales channels**, then **Develop apps** and open **Build apps in Dev Dashboard**.
Click **Create app** and name it **Asa Custom App**, then click **Create**.
If you cannot access the Dev Dashboard, you may lack the required permissions. Ask your store admin. For help from Asa, email [help@alphablocks.ai](mailto:help@alphablocks.ai).
In your custom app, open **Access > Scopes** and paste these scopes:
```
read_app_proxy,read_content,read_customer_events,read_customers,read_discounts,read_fulfillments,read_inventory,read_legal_policies,read_metaobject_definitions,read_metaobjects,read_online_store_pages,read_orders,read_pixels,read_product_listings,read_products,read_publications,read_themes,write_app_proxy,write_pixels
```
Click **Release**, then **Install** and select the store to install on.
Open the **Settings** tab in your custom app.
Under **Credentials**, copy the **Client ID** and **Secret** — you need both in Asa.
Navigate to **Add Content** in the sidebar, open the **Apps** tab, and click **Connect** on the **Shopify (Custom App)** card.
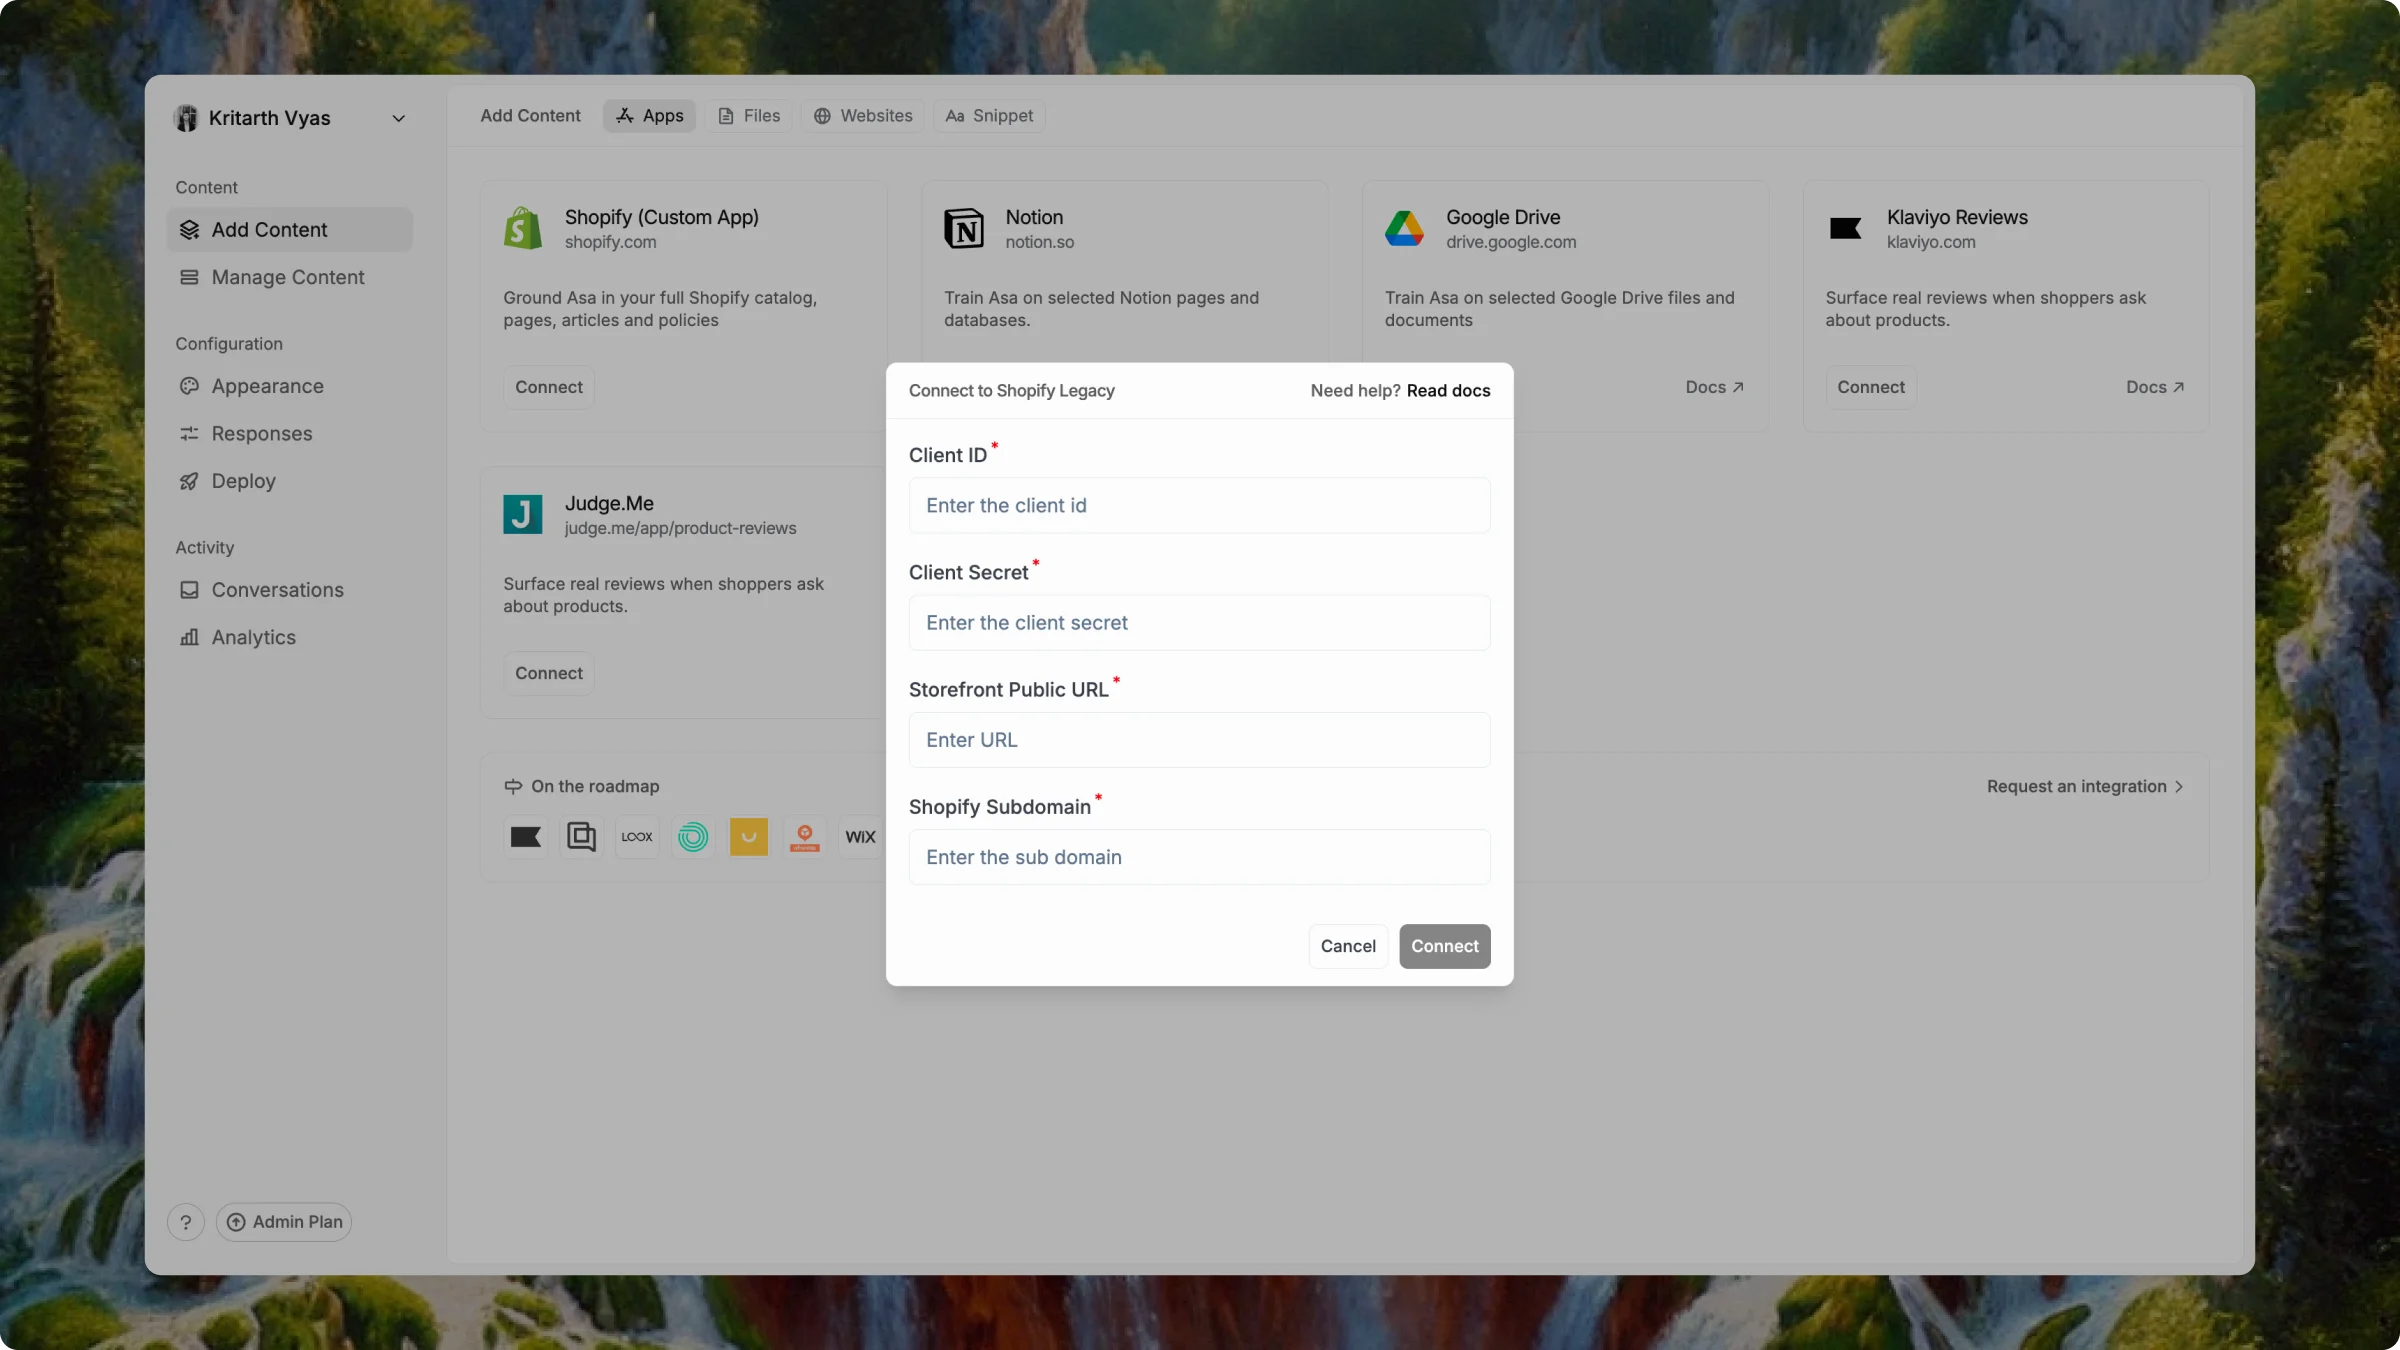 Enter your credentials:
| Field | What to paste |
| ------------------------- | ------------------------------------------------------------------------ |
| **Client ID** | Client ID from your custom app |
| **Client Secret** | Secret from your custom app |
| **Storefront Public URL** | Your live store URL (e.g. `https://acme.com`) |
| **Shopify Subdomain** | Subdomain from **Settings > Domains** — the part before `.myshopify.com` |
Example: if your admin URL is `https://admin.shopify.com/store/acme/settings/domains`, your subdomain is `acme`.
Click **Connect**. When setup succeeds, the card shows **Connected**.
Connecting Shopify does not train Asa on your catalog yet. You choose what to train in the next section.
Use this path after the Asa app is live on the [Shopify App Store](https://apps.shopify.com/). It is the simpler install flow once listing approval is complete.
**Asa customers:** The Shopify app is still in App Store review and is not available for general use yet. To connect your store today, use the [**Custom app**](#custom-app) tab above.
The steps below walk Shopify App Store reviewers through the install and connect flow. They will apply to all customers once the app is approved.
In your **Shopify admin**, open the **Shopify App Store**, search for **Asa**, and open the Asa listing.
Click **Install**, then choose the store you want to connect if you manage more than one.
Shopify shows a permissions screen for what the Asa app can access — products, content, orders, metafields, and related store data.
Review the permissions, then click **Install app** to approve.
Shopify redirects you to the Asa dashboard when installation finishes.
On the Asa sign-in screen:
* **Log in** if you already have an account.
* **Sign up** if you are new to Asa.
After sign-in, you land on **Add Content** and the Shopify connection flow opens for the store you just installed.
After install, Asa opens the Shopify connection on **Add Content**. You may see one of two dialogs:
**A — Confirmation dialog (most common after App Store install)**\
The **Connect Asa to Shopify Store** dialog shows which **Asa AI Agent** (by ID) you are connecting and your Shopify store subdomain.
This step is required to enable the Shopify integration in Asa, even if the Asa Shopify app is already installed on your store.
Click **Connect** to finish the connection.
**B — Full connect dialog**\
If you connect manually from the Shopify card, open **Connect to Shopify App** and confirm both fields:
| Field | What to enter |
| --------------------------- | ------------------------------------------------------------------------ |
| **Shopify Store Subdomain** | The part before `.myshopify.com` (e.g. `acme` from `acme.myshopify.com`) |
| **Public Store URL** | Your public storefront URL (e.g. `https://acme.com`) |
Enter your credentials:
| Field | What to paste |
| ------------------------- | ------------------------------------------------------------------------ |
| **Client ID** | Client ID from your custom app |
| **Client Secret** | Secret from your custom app |
| **Storefront Public URL** | Your live store URL (e.g. `https://acme.com`) |
| **Shopify Subdomain** | Subdomain from **Settings > Domains** — the part before `.myshopify.com` |
Example: if your admin URL is `https://admin.shopify.com/store/acme/settings/domains`, your subdomain is `acme`.
Click **Connect**. When setup succeeds, the card shows **Connected**.
Connecting Shopify does not train Asa on your catalog yet. You choose what to train in the next section.
Use this path after the Asa app is live on the [Shopify App Store](https://apps.shopify.com/). It is the simpler install flow once listing approval is complete.
**Asa customers:** The Shopify app is still in App Store review and is not available for general use yet. To connect your store today, use the [**Custom app**](#custom-app) tab above.
The steps below walk Shopify App Store reviewers through the install and connect flow. They will apply to all customers once the app is approved.
In your **Shopify admin**, open the **Shopify App Store**, search for **Asa**, and open the Asa listing.
Click **Install**, then choose the store you want to connect if you manage more than one.
Shopify shows a permissions screen for what the Asa app can access — products, content, orders, metafields, and related store data.
Review the permissions, then click **Install app** to approve.
Shopify redirects you to the Asa dashboard when installation finishes.
On the Asa sign-in screen:
* **Log in** if you already have an account.
* **Sign up** if you are new to Asa.
After sign-in, you land on **Add Content** and the Shopify connection flow opens for the store you just installed.
After install, Asa opens the Shopify connection on **Add Content**. You may see one of two dialogs:
**A — Confirmation dialog (most common after App Store install)**\
The **Connect Asa to Shopify Store** dialog shows which **Asa AI Agent** (by ID) you are connecting and your Shopify store subdomain.
This step is required to enable the Shopify integration in Asa, even if the Asa Shopify app is already installed on your store.
Click **Connect** to finish the connection.
**B — Full connect dialog**\
If you connect manually from the Shopify card, open **Connect to Shopify App** and confirm both fields:
| Field | What to enter |
| --------------------------- | ------------------------------------------------------------------------ |
| **Shopify Store Subdomain** | The part before `.myshopify.com` (e.g. `acme` from `acme.myshopify.com`) |
| **Public Store URL** | Your public storefront URL (e.g. `https://acme.com`) |
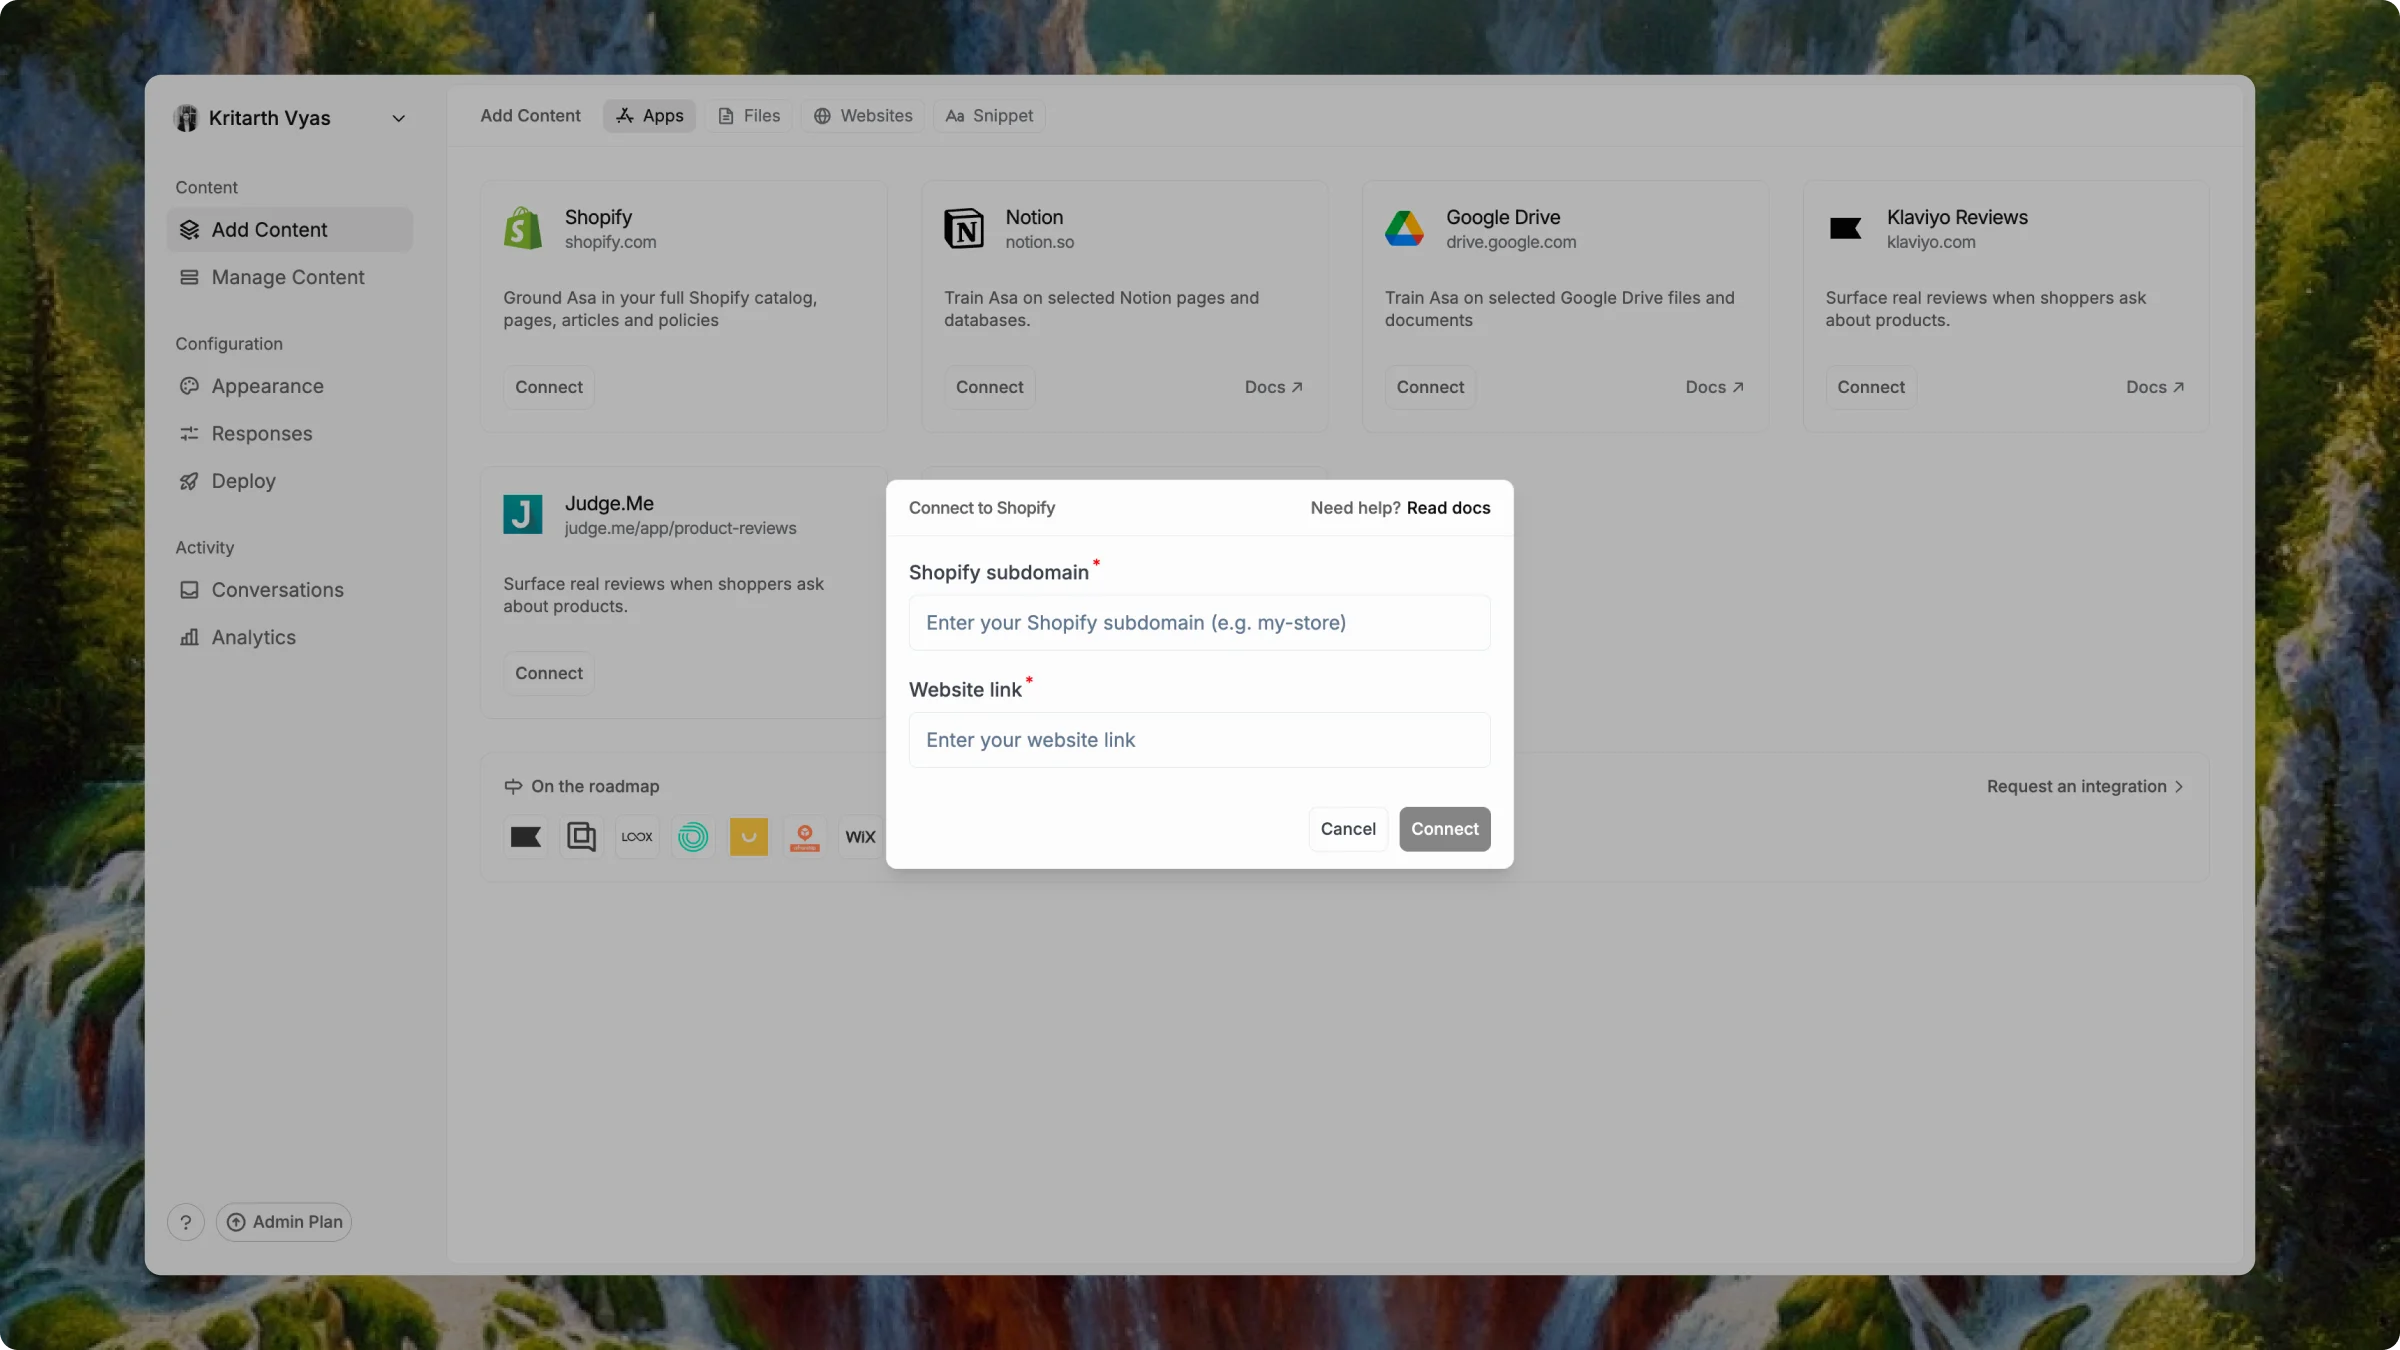 Click **Connect**.
* If the Asa app is not installed on that store yet, Asa redirects you to complete Shopify authorization first.
* When connection succeeds, the Shopify card shows **Connected**.
Connecting Shopify does not train Asa on your catalog yet. You choose what to train in the next section.
## Select content and train
After Shopify connects — on either path — the content selection dialog opens automatically. If it does not, open the **Connected** menu on the Shopify card and choose **Manage integration**.
In **Allow Asa to access these data sources**, select what Asa should learn from — for example **Products**, **Blogs**, **Pages**, and **Policies**.
Click **Connect**.
* If the Asa app is not installed on that store yet, Asa redirects you to complete Shopify authorization first.
* When connection succeeds, the Shopify card shows **Connected**.
Connecting Shopify does not train Asa on your catalog yet. You choose what to train in the next section.
## Select content and train
After Shopify connects — on either path — the content selection dialog opens automatically. If it does not, open the **Connected** menu on the Shopify card and choose **Manage integration**.
In **Allow Asa to access these data sources**, select what Asa should learn from — for example **Products**, **Blogs**, **Pages**, and **Policies**.
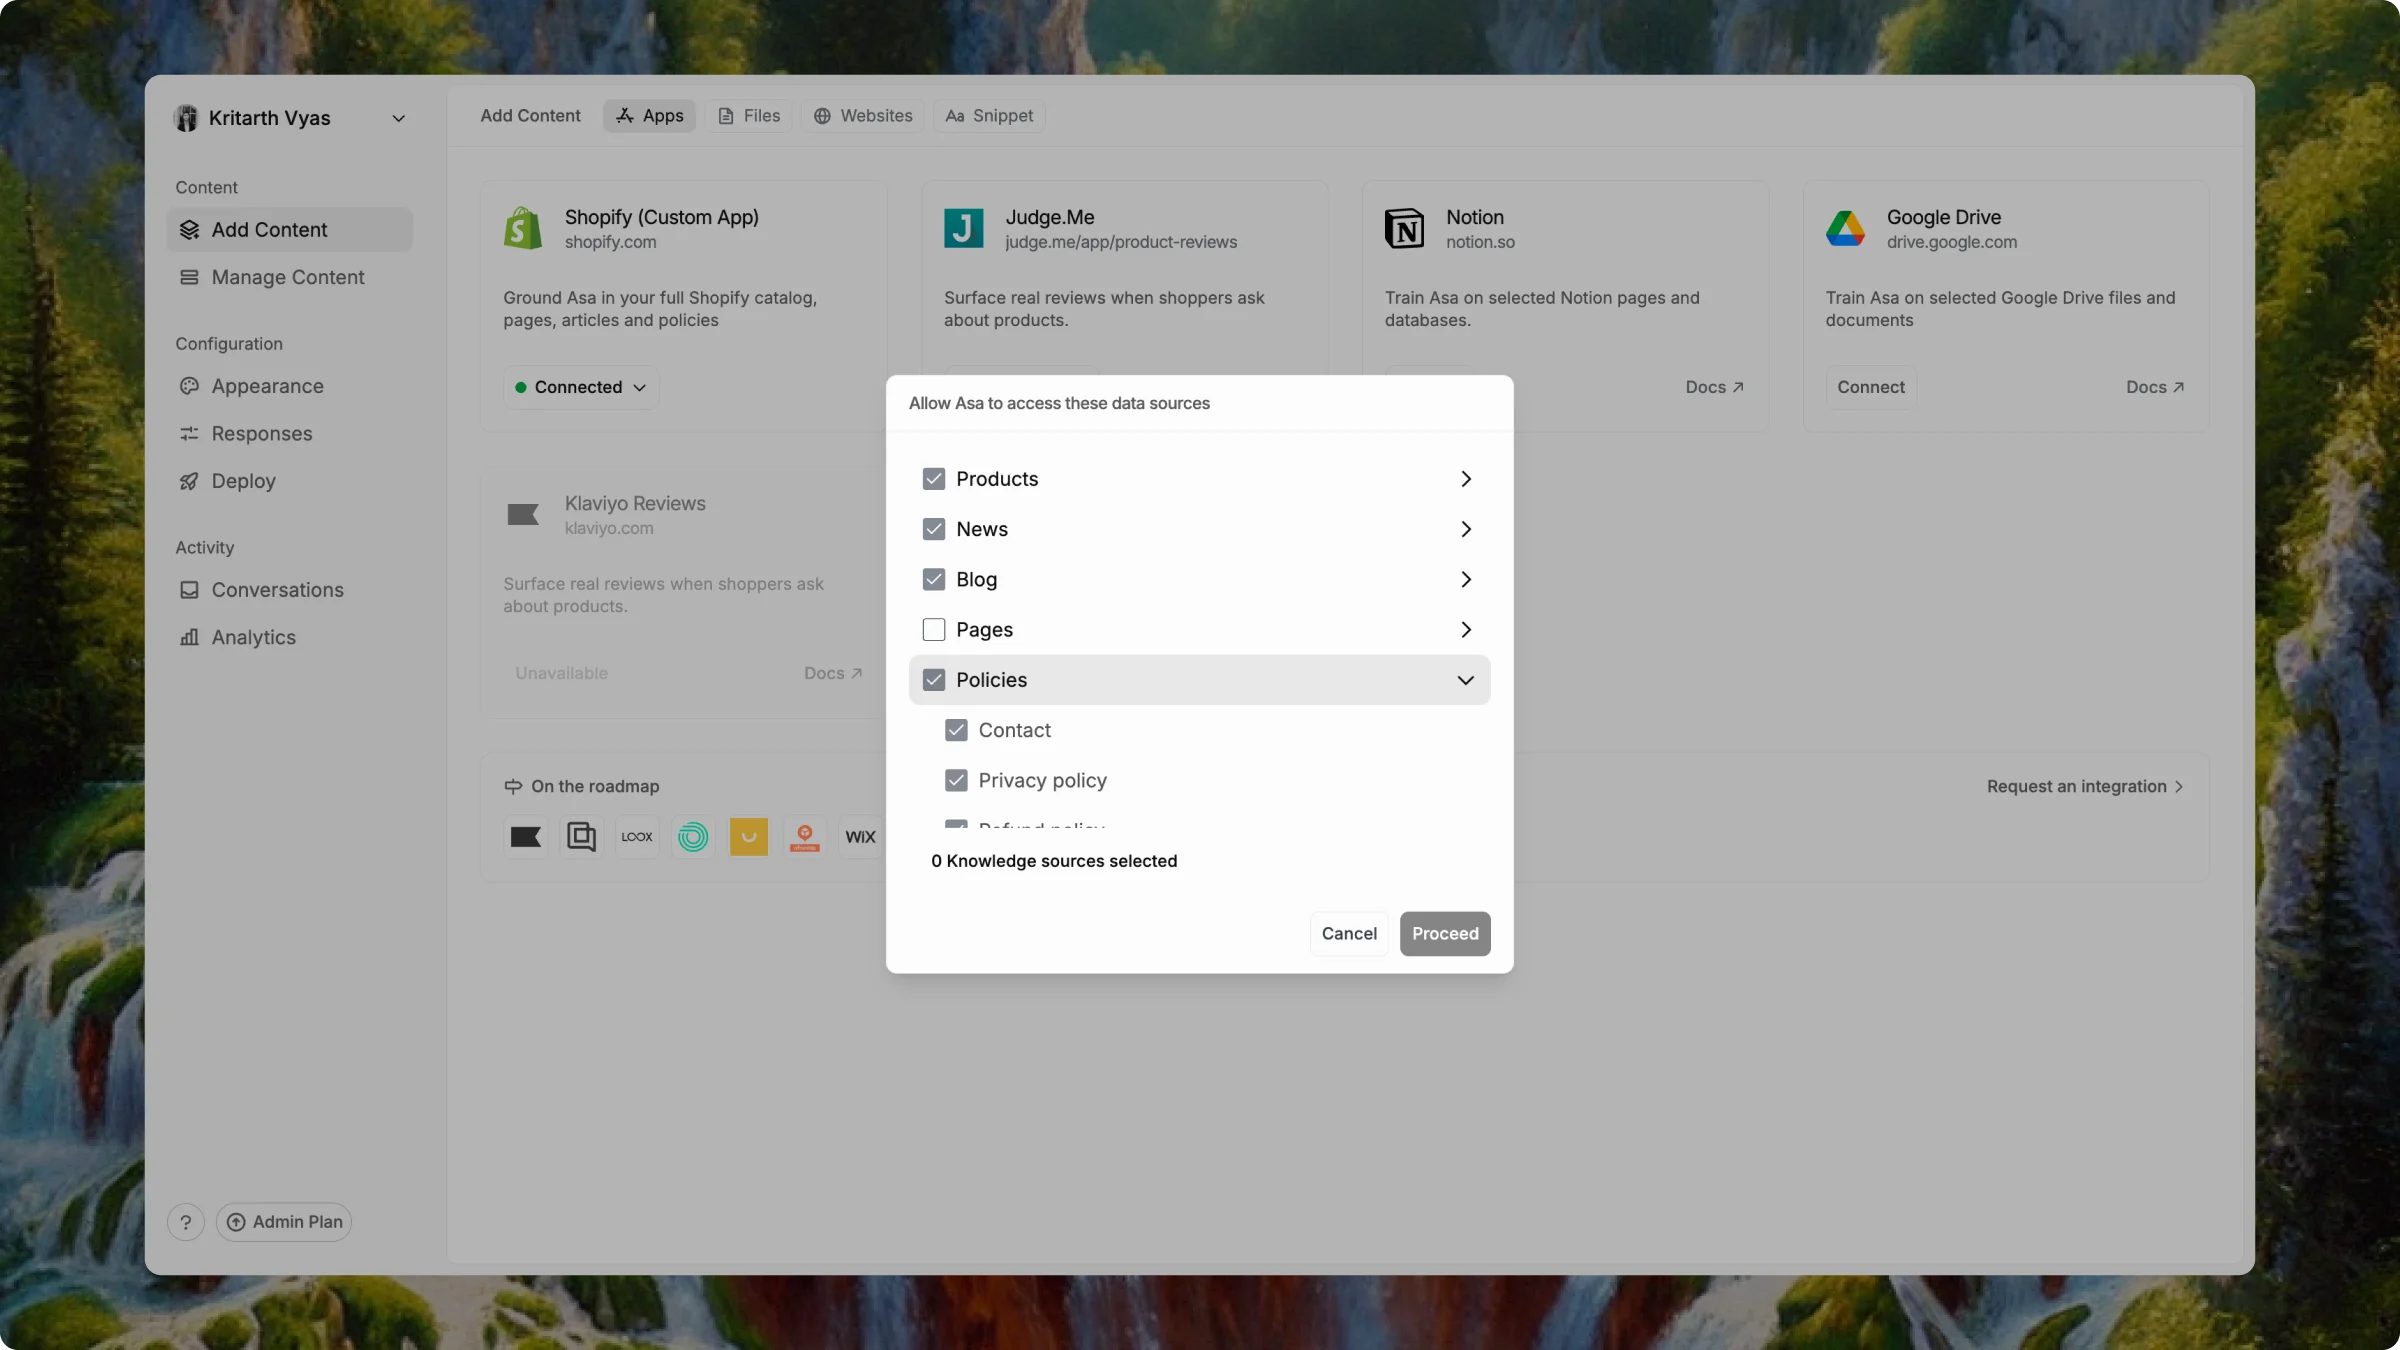 If you selected products, click **Next** to open **Select Metafields** and choose which product metafields Asa should use.
Click **Proceed** to start training. If you did not select products, click **Proceed** from the content screen instead.
Training usually takes a few minutes depending on how much you selected.
Go to **Manage Content** and confirm your Shopify sources show a **Trained** status.
## Keep content up to date
| Action | How |
| ----------------------------- | ----------------------------------------------------------------------------------------------------------------------------- |
| Add or change catalog content | On the Shopify card, open **Connected** → **Manage integration** to update your selection. |
| Retrain after Shopify edits | Update products or pages in Shopify, then retrain from **Manage Content**. |
| Custom app permissions | Custom app setup must include all Admin API scopes from the **Add Admin API scopes** step — Asa only accesses what you grant. |
To put Asa on your storefront after training, go to **Configuration > Deploy** and follow the Shopify channel instructions.
## Notes
* Until the Asa Shopify app is approved, use the **Custom app** path and the **Shopify (Custom App)** card in **Add Content**.
* After App Store approval, the **Shopify app** tab describes the install-from-store flow.
* Double-check credentials and store URLs — typos are the most common connection failure.
* Only the scopes or permissions you approve are used by Asa.
If you need help, reach out at [help@alphablocks.ai](mailto:help@alphablocks.ai).
If you selected products, click **Next** to open **Select Metafields** and choose which product metafields Asa should use.
Click **Proceed** to start training. If you did not select products, click **Proceed** from the content screen instead.
Training usually takes a few minutes depending on how much you selected.
Go to **Manage Content** and confirm your Shopify sources show a **Trained** status.
## Keep content up to date
| Action | How |
| ----------------------------- | ----------------------------------------------------------------------------------------------------------------------------- |
| Add or change catalog content | On the Shopify card, open **Connected** → **Manage integration** to update your selection. |
| Retrain after Shopify edits | Update products or pages in Shopify, then retrain from **Manage Content**. |
| Custom app permissions | Custom app setup must include all Admin API scopes from the **Add Admin API scopes** step — Asa only accesses what you grant. |
To put Asa on your storefront after training, go to **Configuration > Deploy** and follow the Shopify channel instructions.
## Notes
* Until the Asa Shopify app is approved, use the **Custom app** path and the **Shopify (Custom App)** card in **Add Content**.
* After App Store approval, the **Shopify app** tab describes the install-from-store flow.
* Double-check credentials and store URLs — typos are the most common connection failure.
* Only the scopes or permissions you approve are used by Asa.
If you need help, reach out at [help@alphablocks.ai](mailto:help@alphablocks.ai).